with Ancient Blue® and Becoming Moonlight®
 To re-imagine ancient Celtic woading, the blue body art of pre-Roman Britain, use Ancient Blue® from http://www.mehandi.com HERE: http://www.mehandi.com/shop/skinindigo/ | When
the Romans invaded the Celtic tribal lands, they saw Celts wearing blue
body art. Ancient Celtic people stained their skin blue with dye
made from plants that contained the indigo molecule. Are you
interested in ancient Celtic body art? You can do this! Scroll
down this page for instructions. First, download the FREE ebooks on Celtic woading and indigo blue body art:
Finding Blue ~ History examines the historic record of Celtic woading and indigo body art |
    Begin
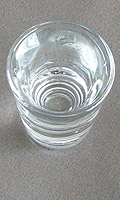
by creating the indigo vat. Make
a small vat in a shot glass. Your vat will oxidize and exhaust in about
20 minutes. When your vat is exhausted (not staining any more)
make a new vat. Your full instructions for making the vat are in Finding Blue: Part 2: | Begin
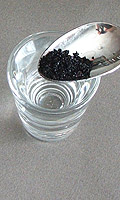
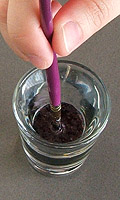
by creating the indigo vat. Drop about
1/2 teaspoon of the indigo crystals into a narrow shot glass with about
1/4 to 1/3 shot of water. Allow the indigo crystals to drop
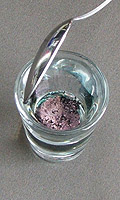
to the bottom of the vat. DO NOT STIR. Stirring will
oxidize the vat, and spoil the stain. Your vat will be ready when you see a scum
form on the top of the water, about 5 minutes after you add the
crystals. Purchase Ancient Blue® crystal indigo HERE. When you work, pierce your brush straight through the sum into the vat, trying to not introduce any oxygen into the vat. |
 | All
lotion, cream, sweat and dirty must be removed from the skin. Wash the
skin throughly; Dawn dishwashing liquid seems to do the best job of
cleaning the skin. You may sketch with indigo that has has been in contact with air; start sketching by dipping your brush gently into the top of the vat. This area is oxygen rich, and won't create much stain, so you can rough in the design and make mistakes. Thte bottom of the vat has little oxygen, and that part of the vat will stain skin blue, fast and dark. Use a brush with synthetic nylon hair. The vat is alkaline and will 'rough up' natural hair. Purchase synthetic fiber brushes HERE. |
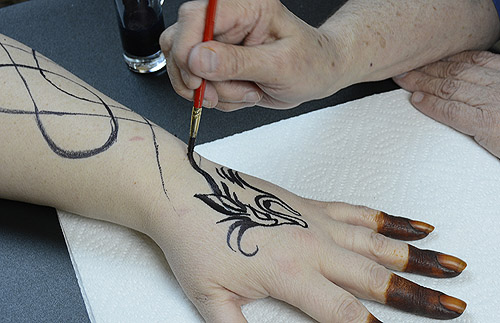
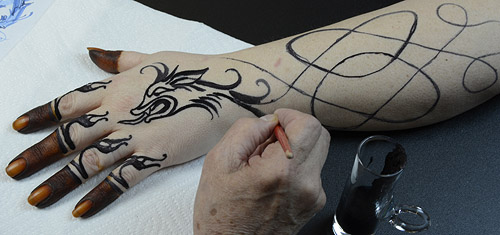
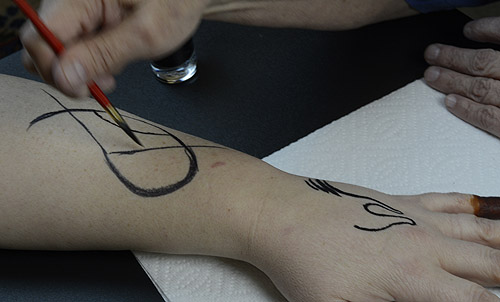 | It is very easy to lay out Celtic knotwork in Ancient Blue® crystal indigo. Sketch in the patterns by painting from the top area of the vat, the part that has is in contact with oxygen in the air. Oxidized indigo will stain skin poorly, if at all. Any mistakes you make with this part of the vat will wash away. Get FREE step-by step Celtic patterns, history, science and techniques of and moreabout Celtic woading HERE in "Finding Blue!" |
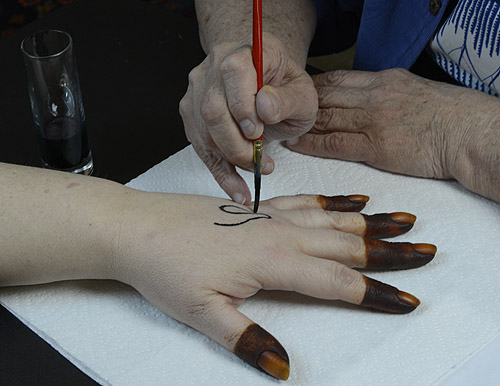
 | When
you've finished lightly sketching in the design, make dark lines that
will stain the skin. To make dark lines, pierce the scum with your brush and dip it to the
floor of the vat. The floor of the vat has less
oxygen, so the precursor indigo molecule on the floor will be ready to stain
skin. Dip your brush stright to the bottom of the vat, and lift it straight out. Do not stir the vat. Wipe the excess against the side of your shot glass. If your brush is too heavily loaded with vat, it will wick on your skin, especially on the wrist and knuckles. |
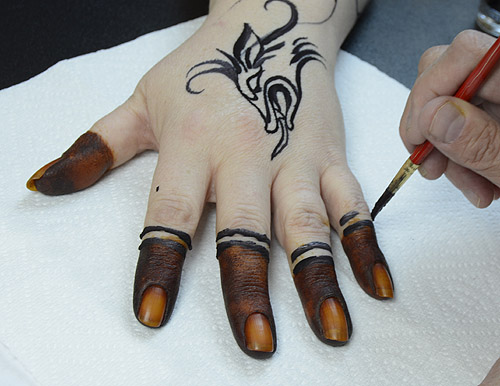 | Band
your hennaed fingertips with Ancient Blue®. I'm fond of
working Ancient Blue® onto someone who already has hennaed
fingertips. I LOVE the look! These fingertips and fingernails were hennaed, then covered to darken the stain. This henna stain is two days after application. Purchase Ancient Sunrise® henna HERE. |
 | Make finger patterns. Work carefully so the dye doesn't trickle into the knuckle creases. |
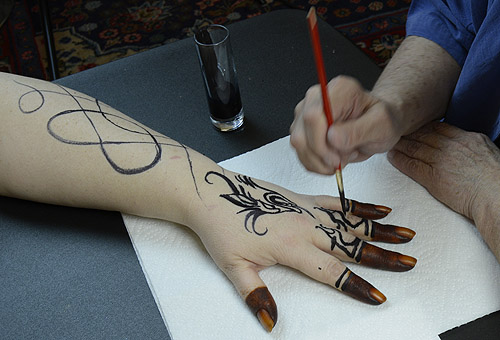
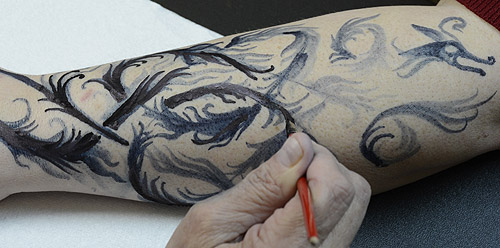
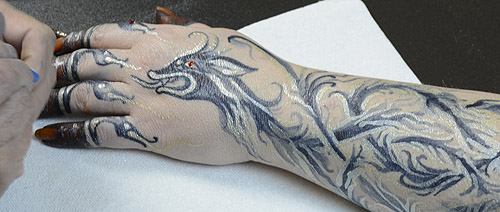
 | Continue painting the pattern up the arm. Once you dip your brush to the floor of the vat, lift it out, and wipe the excess on the side of the shot glass, you've got about 15 seconds to work before the indigo begins to oxidized. Dip your brush frequenltly, and work quickly and boldly. One minute after your brush is out of the vat, the dye will be oxidized and stain poorly. |
 | Since the basic knotwork pattern is already here, it's easy to make the 'over under' as you go along. The vat stains your skin in the first moments. Any blackened dye on the surface of the skin has ceased to dye; leaving it on longer won't create a darker stain. |
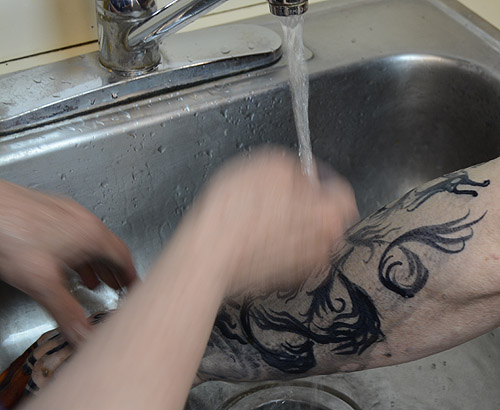
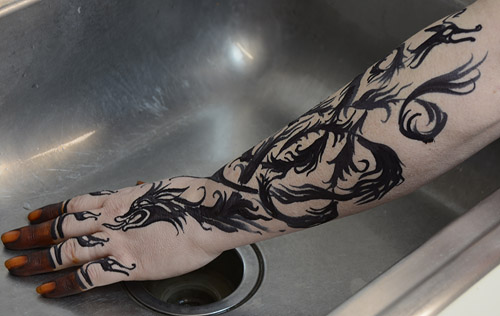 | When you've completed the first dye application, rinse off the excess oxidized indigo. Arms and legs are easy to get into a sink. If you've got full body woading, you'll need to use a garden hose or a shower. If your sink or shower gets stained, use bleach to remove the blue. |
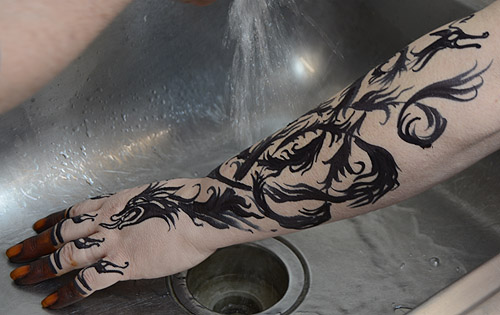 | Flush the painted skin with abundant running water. Washing outside with a garden hose works well, but can feel pretty brisk. Full body woading is a great project for a hot summer day! |
 | Rub a little dishwashing liquid between your hands (Dawn dishwashing liquid seems to do the best job) and rub your soapy hands over the painted area. |
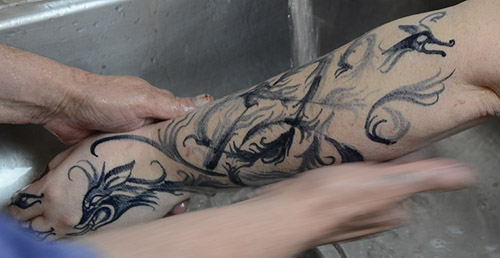 | Rinse
thoroughly to get all of the oxidized indigo off the surface of the
skin. Don't scrub, just keep rinsing until the stain that is
actually in the skin is left. Some areas will have a deep stain, some will not. That will depend on how long your brush was out of the vat. The darkest stain will be from points when your brush touched the skin right after being at the bottom of the vat. Skin may stain unevenly. Sun damaged skin does not take indigo well. There may be a few oily spots on skin that don't stain well. Indigo is a little unpredictable; let that assist your creativity rather than discouraging it. |
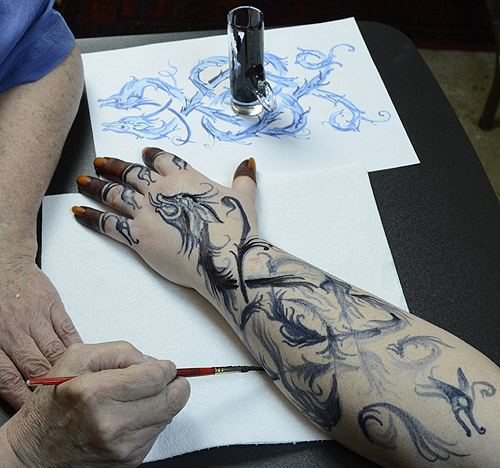 | Pat the skin dry after rinsing. Paint over areas that you want to have darker. Two applications of indigo are better than one, but three are not better than two. Skin won't take up an indefinite amount of indigo, and it doesn't penetrate deeply into the skin, as henna does. |
 | Continue to work through the pattern with a second layer of Ancient Blue® dye, repainting areas that you would like to have darker. |
 | After you have finished dyeing the skin, rinse one more time. Do not scrub. Do not rub. Just use plenty of water. |
 | If
you like the watercolor look to your indigo at this point, you're done!
The stain will last several days, and gradually fade out like old
blue jeans. If you want to work with Becoming Moonlight® media, to make your 'reimagined Celtic body art' more imaginative, add the other techniques now. You can paint into indigo with Temptu temporary tattoo paint. Always shake your bottle of Temptu vigorously before use. Pour a few drops of Temptu onto a plate. Click HERE to purchase Temptu temporary tattoo paint. Click HERE for instructions on using Temptu temporary tattoo paint. |
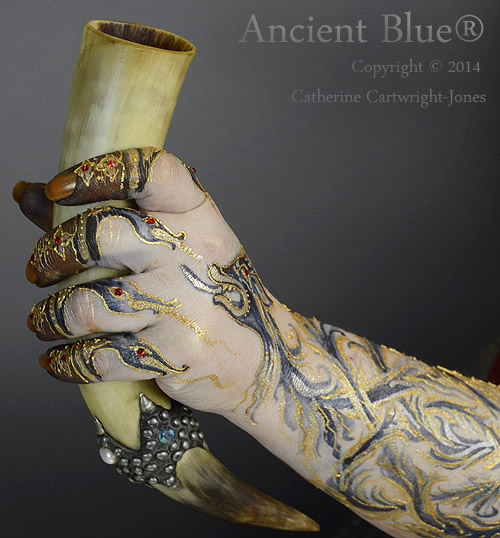
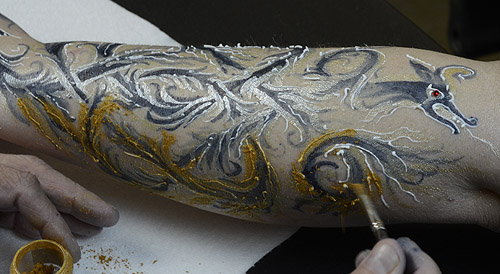
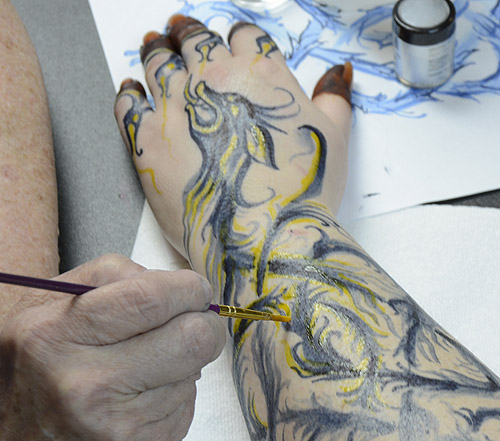 | For
this piece, I want the dragons to appear to have pale, silvery gold
fire flowing off them as they knot themselves around each other. I start this by painting in yellow Temptu with a fine brush. I let the Temptu paint dry about ten minutes. The Temptu will last several days on the skin, once it is set with gilding powder. |
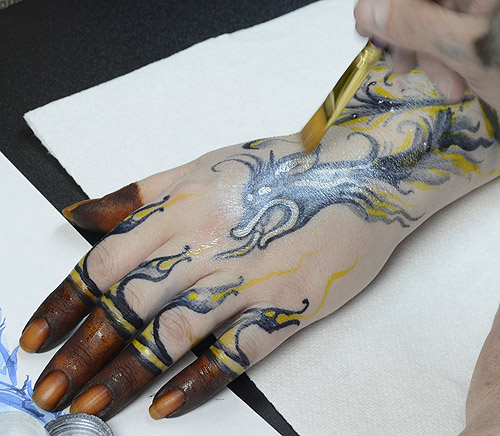 | When this yellow Temptu is dry, I brush pale silvery gilding powder over it. Click HERE to purchase Becoming Moonlight® gilding powder. For this project, I used Diamond Mehron Precious Gems powder. Click HERE to purchase Mehron Precious Gem powder. Brush gilding powder over Temptu with a wide brush. |
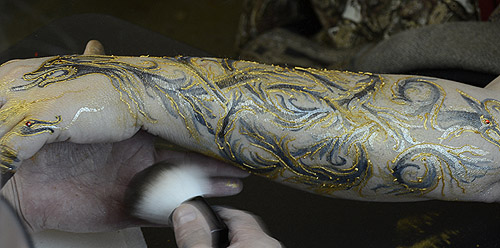
 | All
of the Becoming Moonlight® body art products are formulated and tested
so that they may be used together in body art with without technical
issues or safety problems. Continue brushing the excess gilding powder off the skin. |
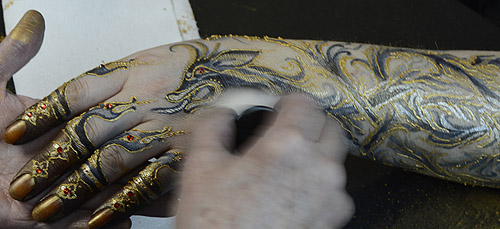
 | Add Becoming Moonlight® gems to the dragon's eyes. You can read instructions for adding Becoming Moonlight® HERE. Click HERE to purchase Becoming Moonlight® gems. |
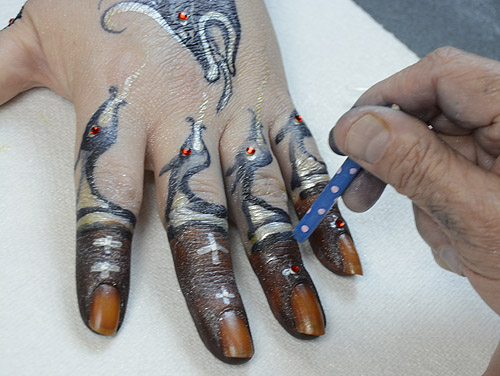 | Apply
a dot of Becoming Moonlight® gilding paste to the place where you
want to put a gem. Pick up a gem with a birthday candle.
Put the gem precisely in place, on the dot of gilding paste.
Click HERE to purchase Becoming Moonlight® gilding paste. |
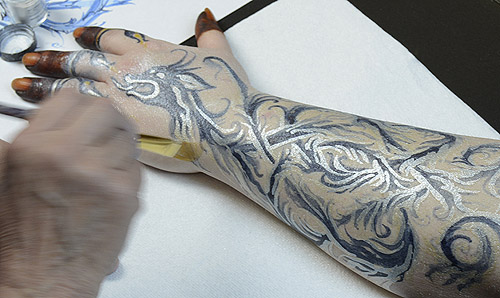
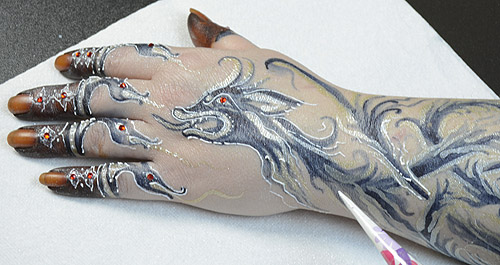 | Use Becoming Moonlight® gilding paste to make fine, raised lines that define and complete your work. Apply your gilding paste with a cone, exactly as you would apply henna. Use very thin lines, much thinner than you would use for henna. Thick lines will dry slowly. Click HERE to purchase Becoming Moonlight® gilding paste. |
 | Your
Becoming Moonlight® gilding paste will dry in less than ten minutes. It
will stay white and raised; it will not go transparent and flatten out
as Pros-aide does. After ten minues, brush gilding powder over your Becoming Moonlight® gilding paste. |
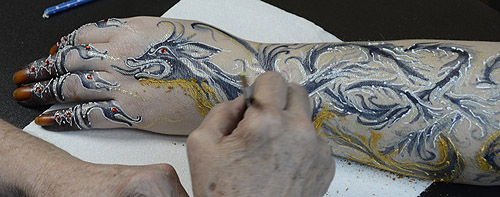
 | Keep brushing gilding powder over all of your gilding paste. Click HERE to learn more about how to do these Becoming Moonlight® techniques. |
 | After you have brushed gilding powder over all of the Becoming Moonlight® gilding paste, brush away the excess with a soft, wide brush, such as a Kabuki brush. |
 | Fluff off all the excess gilding powder with a Kabuki brush. Click HERE to purchase any of the Becoming Moonlight® brushes used in this work, including the Kabuki brush. |
| Cheers!
This Ancient Blue®, Ancient Sunrise®, and Becoming Moonlight®body art will stay intact with soap and water for a few days,
and fade away completely in one week, except for the henna. The henna will last about three weeks. You can do a new one next week! |
The Henna Page information is provided free to you by the support of TapDancing Lizard LLC site group and Mehandi.com.
 |  Email info@mehandi.com |  |  |
 Laboratory testing for quality and purity Why
is it important for henna to be tested by an independent laboratory to
certify lawsone content, lead, pesticides,
contaminants and adulterants? |  Who Runs this Place? Contact: info@mehandi.com |  TapDancing Lizard® LLC group includes The Henna Page® Mehandi Henna for Hair Empire LLC Bittersweet's LLC Ancient Sunrise® Becoming Moonlight® and more |