| Clicking on an image will open another window. You can use the second window to scroll through all the enlarged images associated with this article |
The Henna Page Journal |
|
|
Recipe, Application and Aftercare |
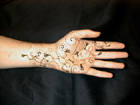 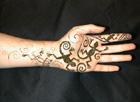 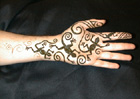  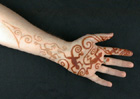 |
Stage one of the application was to line up the design on the recipient's hand. Using a soft eyeliner pencil I marked the position of key elements. The henna was applied using a hand rolled cone made with medium thickness polythene. The harder or thicker the plastic used to make the cone, the greater degree of control can be exerted over the line produced. The greater the control the more dead or more sterile the line can appear. I try to be sensitive to the type of art work I'm drawing, for example an Indian style application would be better suited to a more fluid tool such as a carrot bag; conversely, for tribal pieces I would use the hardest tip possible, e.g., a bottle. The first henna lines were laid down before trimming the tip of the cone. This gives an impossibly fine line and you must use very well sifted henna. Using this super fine line the feet of the lizards were drawn and outlines of the larger fill areas were placed. After the entire design was roughed in with all the fine detail in place the tip of the cone was cut to produce a heavier line and the fine lines around the feet were filled in. At that stage the body outlines were filled out, as well. In the final stage the tip of the cone was cut again to enable more rapid fill of the larger areas to be hennaed. A new fine tipped cone was made up for the finishing touches and tidying up. Aftercare |
| |
|
|
|
|||
|
Return to The Henna Page |
|||
 |
|||